

In this blog, we will explain to you why and how to convert MBOX files to PST file format. There are different approaches to exporting MBOX files. We will cover all of them. Also, we suggest the most effective way to Export MBOX to PST. So, read the blog carefully.
MBOX files represent electronic mail message containers. Message containers may also contain attachments. MBOX is a versatile file format used by a variety of email clients. Apple Mail and Mozilla Thunderbird can read MBOX files.
Before understanding the process, it is important to know why users export MBOX files to PST.
Reasons for Exporting MBOX to PST?
There are several reasons to export MBOX files. Some of the significant reasons are listed below.
- A connection to the Internet is needed if you want to perform tasks with MBOX files, but not with Outlook PST files.
- Outlook is a Microsoft product, so it has better security features than others.
- Migration from another mail client to Outlook can be made easier with the conversion of MBOX to PST.
After understanding the reason, let us examine the method to convert MBOX to PST.
How to Export MBOX to PST Manually
The manual method is made up of three steps. To convert MBOX to PST manually you should follow them.
- Create MBOX emails as EML files.
- Drag and drop the EML files to Outlook.
- Exporting emails to PST
Step 1: Create MBOX emails as EML files
For exporting MBOX file to PST file format, you first need to export MBOX mailbox as EML files. Follow the steps below.
- Open the MBOX email client. Select the Inbox
- Choose the New Folder
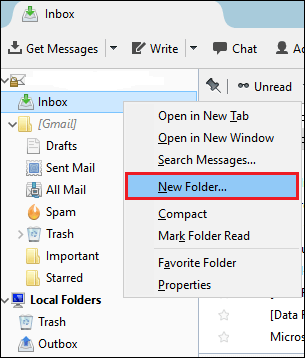
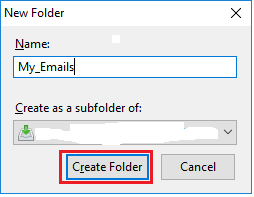
- Provide the desired name and press the Create Folder
- Export all EML messages to this new folder.

- Then, you can check all emails in the My Email
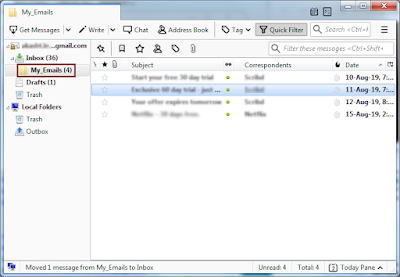
- Finally, click the Save as option after selecting the location.

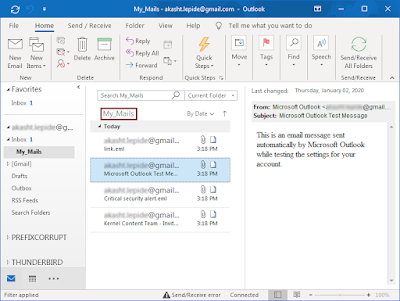
Step 2: Drag and drop the EML files to Outlook
- Select the folder containing EML files.
- Choose all emails.
- Lastly, drag and drop emails into Outlook folders.
Step 3: Exporting Emails to PST
- Open MS Outlook and click on the File option in the menu bar.
- Choose the Open & Export option and click on the Import/Export icon.
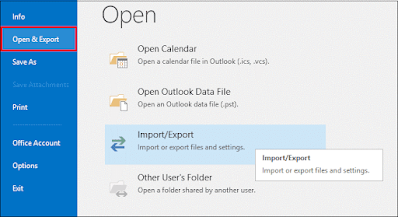
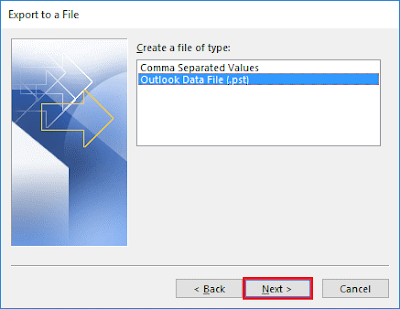
- Choose the Export to a file option from the menu and click the Next

- Select the Outlook Data file (.pst) and click Next.
- After that, select the folder containing EML files and click on the Next

- Finally, select the destination location and click on the Finish

These are the steps to export your MBOX files to PST file format. They are effective and easy to perform. However, some users may have difficulty performing this procedure. Also, there are other limitations of the manual procedure. Let us discuss them in detail.
Limitations of the Manual Method
Manual processing has drawbacks that make it difficult for users to perform. Some of the significant limitations are listed below.
- Manually completing this task takes a long time.
- There are a lot of steps so technical knowledge is required.
- It might be possible to lose data using this method.
To overcome these types of drawbacks, we will introduce a third-party solution which is very helpful for technical or nontechnical users.
Professional Method to Export MBOX to PST
We have explained that manual methods have many limitations and due to their drawbacks, users do not favor them. Hence, to ease the process, the DRS MBOX File Converter can be used. It is designed to provide an easy way to convert MBOX files. This tool enables users to easily export MBOX files. MBOX files can be converted to PST or any other file format, and they can be migrated to Gmail and other email clients. This utility provides a free demo version, and it offers many advanced features.
Conclusion
The purpose of this blog is to provide you with information on how to convert MBOX files. So, we explained all the different methods to export MBOX to PST. Also, we discussed the professional approach which simplifies the process and saves the user's time.
Post a Comment